Hitting the Reset Button

Life happens.

It’s been nearly a year since I’ve written here. I had big plans for 2017 — and then life happened. My priorities shifted to something that needed my full and immediate attention, so my plans were shelved.

But it was far from a year without crafting. Even in those times when my heart hurts and it feels like the weight of the world is on me, I am grateful to find respite in creating. Maybe 2017 wasn’t my prolific year of making, but I know that my priorities were in the right place.

And now I’m determined to get back to crafting and writing, and eventually dusting off those shelved plans.

I hope you’ll follow along.

On the Road, QuiltCon Edition

What a week! I was fortunate enough to travel to beautiful Savannah, GA, last week to attend my first-ever QuiltCon. The shop had a booth and I was happy to get a chance to go and share the IQ love with quilters from all over the world.


It was such a great experience and I had a blast seeing friends and meeting new people. The first day was bananas: I think none of us left the booth before 2 and even then it was just to race to the bathroom or cram a sandwich down our throats. My friend Lennye and I spent a little while checking out the booths Friday morning before starting work and I may have picked up a thing or two. Working at a quilt shop, I’m pretty fortunate to be surrounded by gorgeous inspiration on a daily basis but I did manage to find one or two things to bring home.

A post shared by Mary Abreu (@thatcraftaddict) on


I was fortunate to do some book signings at the Intown Quilters booth (thanks, Sarah!) and the Stash Books booth during the trip. There may have been a little babbling about bag making but I can’t help myself. I’m pretty passionate about this latest book of mine and really love being able to introduce people to the book and the concept behind it.

On the last day of the show, I dragged Sarah over to look at the quilts because I didn’t want to leave without getting a chance to see them. Some I’d seen online but many of the quilts were new to me and I’m so glad I had the chance to check them out.


Tackling the Harrison Shirt

I’m really into my commitment to sewing more of my wardrobe. It’s gotten me excited to try new things and — if course — picking out the perfect fabrics.

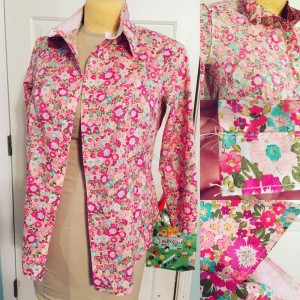
One of the items near the top of my list was Cashmerette’s Harrison button-down shirt. I considered a lot of shirt patterns. This won out because of the beautiful seam lines and cut. I knew it was a style that’s flattering on me and could be a great staple.

IMG_1988

A muslin was a must so I started with some fabric from my stash that I save for such occasions. The sizing was spot on! No changes necessary. Well, that would not have been the case if I’d made a sleeve. But I didn’t and the sleeve is a hair more snug in the upper arm than I’d like.

After the muslin, I cut into the beautiful Regent Street lawn I’d gotten specifically for this shirt. It’s so pretty and has a great hand. Perfect for a tailored shirt.

IMG_2023

I really took my time on this shirt. There was some unsewing and a fair amount of hand sewing (not called for in the pattern — I just preferred it). And there was one really unfortunate curve clipping incident that required re-cutting and sewing the collar and collar stand. Totally worth it.


IMG_2080

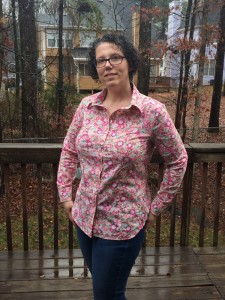
In spite of all the care in construction, I still managed to mess up the buttonholes: they’re sewn horizontally instead of vertically. It’s a bummer but most people won’t notice. I also placed the bust apex button a little higher than it should be, which makes a wee bit of gaping possible.

Overall, though, I’m in love with this shirt. It’s comfortable and flattering, the kind of shirt I can see wearing regularly. On my next one, I plan to slash and spread the sleeve and alter the sleeve length since I rarely wear long sleeves. I also plan to fiddle with the hem a little since I’m not much for tucked in tops. And now that there’s a sleeveless shirtdress option, I can see making even more of these for my wardrobe.

On the ninth day of Hack-mas …

image-1-9

As a gift to you, I’m sharing a hack a day with “recipes” for using my latest book, Hack that Tote!, to create the projects. Some hacks are super easy; others combine elements from multiple patterns in the book. Hopefully, they’ll inspire you to hack a few totes for your holiday gifts!

The seventh Happy Hack-mas project is …

img_1770

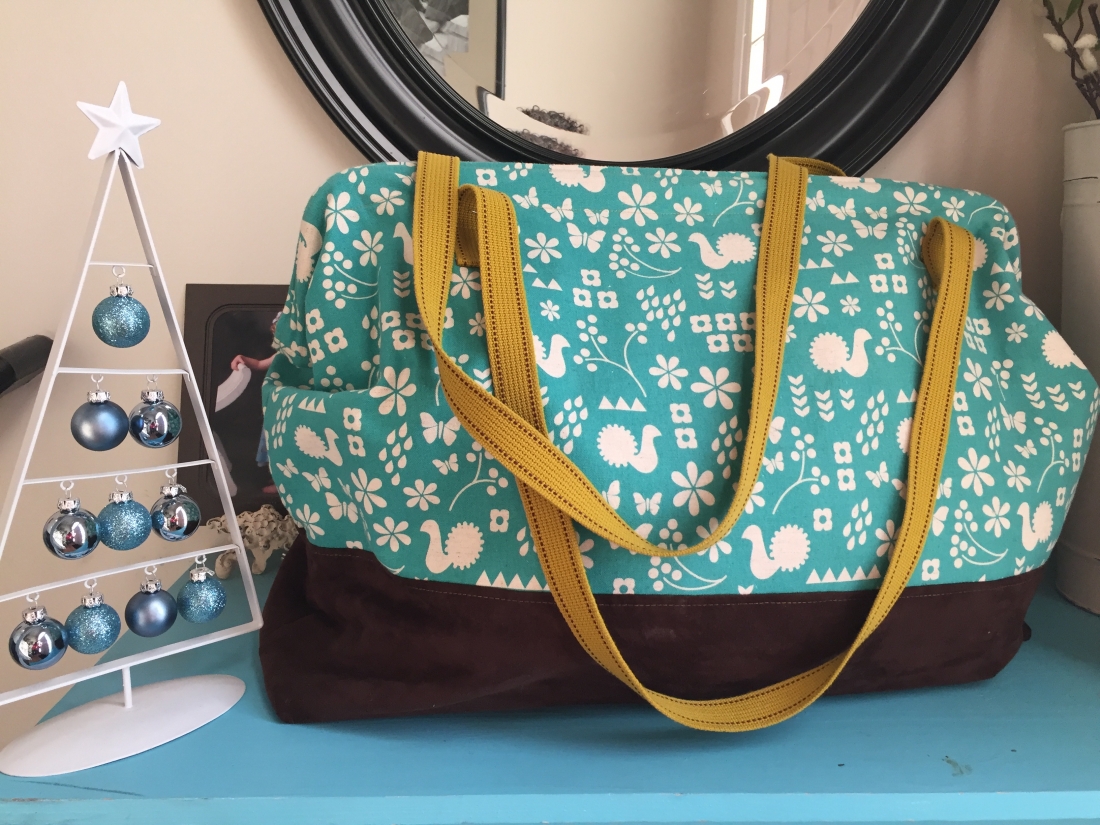
A weekend travel bag! This is the mack daddy of all bags, made right before my most recent trip to Houston for International Quilt Market. It’s an oversized version of the Tubular Frame Purse (pg. 60), made with Kokka linen/cotton canvas designed by Ellen Luckett Baker with a contrasting bottom of Cuddle Suede by Shannon Fabrics. The Echino strapping is a great contrast, although I really wish I’d bought enough to sew between the contrast and main bag seams, then let the straps hug the bag body. This is what happens when you just wing it. The bag fits under the seat in front of you on a plane. I put oversized patch pockets inside and subdivided them specifically for holding my travel essentials, including my personal sized planner.

On the eighth day of Hack-mas …

image-1-9

As a gift to you, I’m sharing a hack a day with “recipes” for using my latest book, Hack that Tote!, to create the projects. Some hacks are super easy; others combine elements from multiple patterns in the book. Hopefully, they’ll inspire you to hack a few totes for your holiday gifts!

The seventh Happy Hack-mas project is …

img_1769

A cross-body bucket bag with drawstring closure and flap! I think this bag mashes up at least three patterns: It’s shaped like the Goodie Bag (pg. 40), has the drawstring closure of the Drawstring Backpack (pg. 54) and has a flap inspired by the Messenger Bag with Flap (pg. 74). I also cut a contrasting bottom panel and the bag straps are attached between the main body of the bag and the contrast.

On the seventh day of Hack-mas …

image-1-9

As a gift to you, I’m sharing a hack a day with “recipes” for using my latest book, Hack that Tote!, to create the projects. Some hacks are super easy; others combine elements from multiple patterns in the book. Hopefully, they’ll inspire you to hack a few totes for your holiday gifts!

The seventh Happy Hack-mas project is …


img_1768

A rectangular tote with suede straps! This is a modified version of the Basic Tote Bag made with some Cotton+Steel cotton/linen canvas I had in my stash, along with some suede handles. The handles are attached with metal rivets through the bag. I also added a chipboard bottom and metal purse feet. I’m currently using this bag as a purse, since it holds all my essentials plus whatever larger items I need to drag along with me these days.

On the sixth day of Hack-mas …

image-1-9

As a gift to you, I’m sharing a hack a day with “recipes” for using my latest book, Hack that Tote!, to create the projects. Some hacks are super easy; others combine elements from multiple patterns in the book. Hopefully, they’ll inspire you to hack a few totes for your holiday gifts!

The sixth Happy Hack-mas project is …

fullsizerender-21

An appliqued library book tote! This project mashes up the Goodie Bag with Reverse Applique (pg. 40) and the Drawstring Backpack (pg. 54). The shape is really simple and made to hold just a couple of books or even a few magazines. It’s one of my favorite quick projects to make as a gift because it’s easy to personalize, doesn’t use a lot of fabric and sews up oh-so quickly.

On the fifth day of Hack-mas …

image-1-9

As a gift to you, I’m sharing a hack a day with “recipes” for using my latest book, Hack that Tote!, to create the projects. Some hacks are super easy; others combine elements from multiple patterns in the book. Hopefully, they’ll inspire you to hack a few totes for your holiday gifts!

The fifth Happy Hack-mas project is …

fullsizerender-20

An insulated lunch bag with zippered top! This project is part scaled-down Basic Tote Bag (pg. 36) and part Zippered Cross-Body Bag (pg. 80). I used laminated cotton for the interior so it’s water resistant and easy to clean — must-have features for a lunch bag, in my opinion. The bag is interfaced with an insulated fleece (Insul-bright), which will help the contents stay at a consistent temperature for a little while. I’d been hoarding the cute food truck fabric from Timeless Treasures for a while and thought this would be a great use for it.